Read this guide if you intend to use any Get Post Details Endpoints.
Short guide
1. Collect Posts- Use the Get Posts endpoint to pull all posts for the month(s) you need.
- Example: One request per month → 12 requests = full year of history.
- Once collected, those months are automatically tracked and updated and posts can be retreived individually using Get Post Details.
- Use the Get Post Details endpoint with a
postIDorpostURL. - It fetches fresh, updated data for any tracked post — quickly and efficiently.
- Collected posts are automatically monitored for new stats (likes, views, comments, etc.).
In-depth guide
Our system is designed to make post data collection efficient and ongoing — without requiring repetitive or redundant API calls. Once you collect a month’s posts, the system keeps tracking those posts automatically in the background. This guide explains how to set it up and how to access post data afterward.1.Initial Data Collection
Before you can start accessing Post Details, you first need to perform an initial data collection using the Get Posts Endpoint for the provided user and for that specific month.Purpose
This step establishes which months’ data you want us to track continuously. Once a month’s posts are collected, the system keeps monitoring them without you having to re-fetch them.How It Works
- Use the Get Posts endpoint to pull all posts for the month you need (for example, April 2025).
- Each request corresponds to a month of posts — so, if you need one year of data, send 12 separate requests (one per month: Jan–Dec).
- Once data for a month has been pulled, it becomes part of the “Collected & Tracked Months” list.
Key Benefit
You don’t need to repeat the Get Posts call again for that month or year. The system will continue updating and tracking metrics (likes, views, engagement, etc.) for those posts automatically.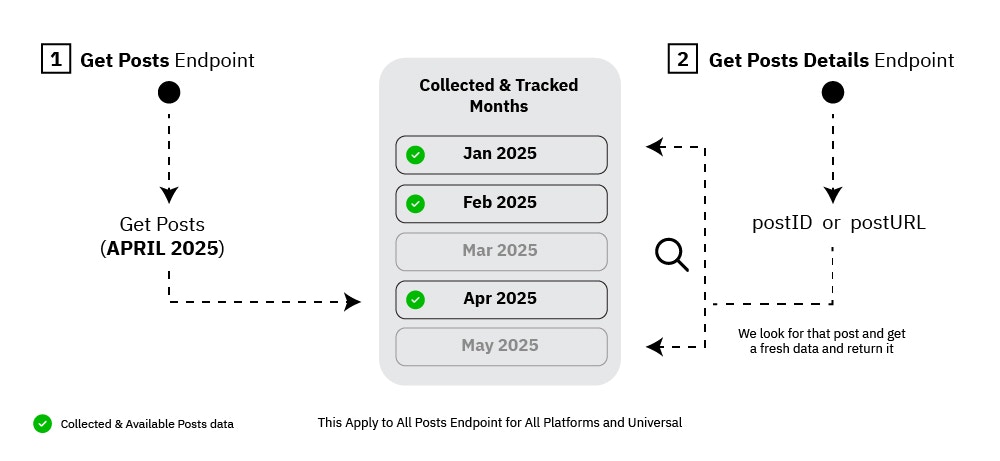
In the diagram:
- The Get Posts Endpoint on the left side retrieves posts for a specific month (e.g., April 2025).
- The collected months (e.g., Jan, Feb, Apr 2025) are shown in the center box — marked with a green check ✅ indicating available and tracked data.
- Months without data yet (e.g., March, May) are greyed out, showing that data for those months are not tracked and unavailable.
- On the right, the Get Posts Details Endpoint receives a
postIDorpostURL. - The system searches for the post within your collected months.
- It then returns fresh, updated data from that month’s tracking history.
2. Continuous Tracking & Retrieval
Once the initial collection is complete, you can retrieve any post anytime using the Get Posts Details Endpoint.Purpose
This endpoint allows you to fetch detailed, refreshed data for any post you’ve already collected — without re-fetching all posts of the month.How It Works
- Provide either the
postIDorpostURLto the Get Posts Details endpoint. - The system looks up that post in your collected and tracked data.
- It fetches the latest metrics and insights (e.g., updated likes, views, comments, engagement rate) and returns them instantly.
Key Benefit:
You avoid heavy data calls. Instead of running Get Posts every time you need a tweet or video post, just call Get Post Details — it’s lightweight, faster, and up-to-date.💡 Best Practices
- Always collect posts data month by month — it keeps tracking organized.
- Avoid re-calling Get Posts for months you already have tracked unless you want to get a list of all posts within that month all at once.
- Use Get Post Details for stats updates or single-post lookups.
- Use universal endpoints when you want this logic to apply across multiple platforms (Instagram, TikTok, YouTube, X, youtube, telegram)